HTC Vive Developer Editions
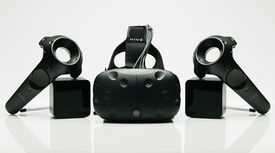
| |
|---|---|
| Developer | HTC, Valve |
| Requires | PC |
| Predecessor | None |
| Successor | HTC Vive CV1 |
| Operating System | Windows |
| Display | Dual Panel |
| Resolution | 2160 x 1200, 1080 x 1200 per eye |
| Pixel Density | ?? |
| Refresh Rate | 90 Hz |
| Image | |
| Field of View | 110° (diagonal) |
| Optics | |
| Optics | Fresnel Lenses |
| Tracking | 6DOF |
| Rotational Tracking | Gyroscope, Accelerometer, Laser Position Sensor |
| Positional Tracking | Base Stations |
| Update Rate | ?? |
| Tracking Volume | 120°H x 120°V (over 21 feet range) |
| Latency | ?? |
| Audio | Built-in headphones, external headphones |
| Camera | Pass-through camera |
| Connectivity | 2 HDMI ports, 2 USB ports, 1 headphone jack |
| Input | Controllers in both hands |
| Cable Length | 5+ meters |
- See also: HTC Vive CV1
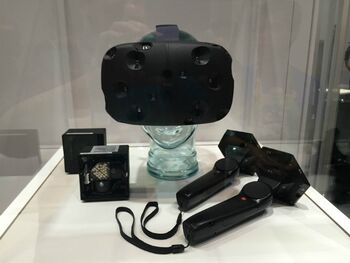
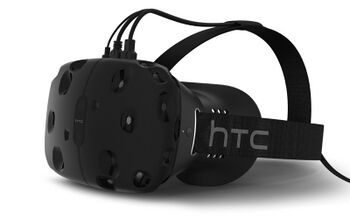
HTC Vive Developer Editions or HTC Vive Development Kits are Virtual Reality head-mounted displays developed by HTC and Valve as part of the SteamVR ecosystem. 2 versions of the Vive Development Kits were released to select developers in 2015 and 2016. The first version of the HMD (Vive DK1) was announced on March 1, 2015. Similar to Oculus Rift and unlike Samsung Gear VR, HTC Vive requires connecting to a PC, not Smartphone, for its processing. It uses 2 external sensors, called SteamVR Base Stations, to accurately track the user's position and movement in a finite space. Limited amount of Development Kits were released in Spring 2015. A wide consumer release is planned in April 2016.
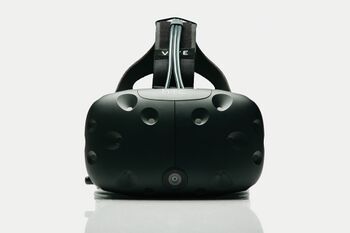
HTC Vive Pre, the second developer edition of Vive (Vive DK2), was revealed on January 5, 2016 in CES 2016. 7000 kits were shipped to select developers in Q1 2016. HTC Vive Pre adds a pass-through camera that shows the outlines of people and objects in real world. Integrated with the Chaperone, the system protects users of the Vive from bumping into things in real life. It also allows users to interact with real life objects while wearing the HMD
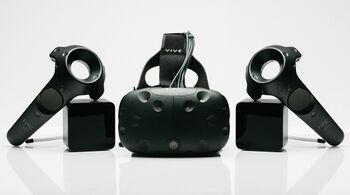
Every order of the Vive Pre comes with the HMD, 2 Base Stations and 2 SteamVR Controllers.
Hardware[edit]
The HTC Vive requires a connection to a PC, preferably a gaming PC with good specs, similar to Oculus Rift. It does not use a Smartphone as its display or for processing. The display of HTC Vive has a resolution of 2160 x 1200 or 1080 x 1200 per eye with the refresh rate of 90 FPS. The HMD has 6 degrees of freedom tracking with the help of Gyroscope, Accelerometer and Laser Position Sensor within the gadget and 2 SteamVR Base Stations externally. The 2 SteamVR Base Stations are placed high up on the 2 corners of the wall in a 90° angle. These sensors allow you to be accurately tracked to 1/10 of a degree within a 15 feet by 15 feet space. HTC Vive has the ability to transform your entire room into a Holodeck, allowing for a full room VR experience.
HTC Vive uses specially designed wireless SteamVR Controllers in both hands. These controllers look like a pair of nunchucks with sensors on top. The controllers allow the SteamVR Base Stations to not only track your head but also your hands. These controllers also have touch pad and trigger.
HTC Vive differs from Oculus Rift with better positional tracking. Because it accurately matches the user's physical movements with reactions in the virtual realm, Valve CEO Gabe Newell boasts that HTC Vive is the first VR Device that does not induce simulator sickness in its users.
While Oculus Rift is advertised as a seated experience. HTC Vive wants the user to move and walk around the 15 by 15 feet zone, allowing for a true holodeck experience.
HTC Vive will feature a pass-through camera that detects objects. The camera is included for safety reasons, not AR. It warns user of moving objects such as pets to prevent the user from stepping on or kicking them.
HTC Vive Pre[edit]
HMD:
- Adds a pass-through camera that shows the general outline of objects and people in real life within field of view. It can be activated at anytime by double-clicking an button on the controller. The system is integrated with Chaperone to show the people and objects beyond the playing area whenever the user is close to the Chaperone boundary. This enhanced Chaperone system gives users additional collision protection while wearing the HMD. The camera also allows users to see and interact with real life objects such as controllers and other Input Devices while wearing the HMD.
- Adds Brighter screen and Fresnel lenses. Introduces a new visual system called Mura correction to give sharper image quality by leveling out the inconsistencies in brightness between pixels. It significantly improves the screen door effect.
- Better ergonomics. The HMD is smaller and more compact. It has an additional strap that fits on the lower back of the head. It has removable foam inserts called face gaskets that come in 2 different sizes to accommodate different face shapes and eye glasses. It also adds an IPD adjuster.
Controllers:
- The newly designed controllers are sleek, refined and ergonomic. The controllers feature an open ring at the top, which contains Lighthouse sensors. The trigger has been upgraded into a dual-stage trigger similar to other Steam controllers. Lithium polymer batteries were built into the controller, allowing for 4 hours of activity per charge, a significant improve upon the 2 hours of previous edition. A microUSB charge port can be found at the bottom of the controller.
Base Stations:
- Smaller and quieter with better tracking. They have tripod threading to be set up on tripods. Base Stations can now operate wirelessly.
Specifications[edit]
Setup Tutorial[edit]
Developer Edition[edit]
Preparation:
- Choose a room with space for room-scale VR experience.
- Clear the space of clutter and objects that might obstruct movement or bump into.
- Move or cover mirrors and other reflective objects. (Developer Edition only)
- Unpack your HTC Vive boxes carefully. There should be 3 boxes: the headset box, Basestation box and controller box.
- The headset box should contain the HMD, interface box, interface box pad, 3 in 1 headset cable, short USB cable, short HMDI cable and AC adapter.
- The Basestation box contains 2 Basestations, 2 power adapters, mounting hardware, 2 mounting plate, more hardware, 2 shelf adapters and 50 ft sync cable.
- The controller box contains 2 VR controllers, 2 lanyards, 2 wireless dongles, 8 batteries, 2 battery chargers, 2 AC adapters, 2 USB adapter boards.
Basestations setup:
- Find a 2 locations in the room to mount the Basestations. The Basestations should be mounted on opposite corners of the room, above head height (on ceiling), angle down 30 to 45 degrees. Each basestation has a field of view of 120 degrees in both axis.
- The maximum distance between the basestations should be 15 feet or 5 meters. The play area is about 12 x 9 feet or 4 x 3 meters. The area does not have be perfectly square. Use tape to indicate the area is helpful.
- Do not mount the basestations on surfaces that are vulnerable to vibration.
- Hardware included allows the basestations to be mounted on walls, ceilings, shelves or tripods.
- Attach power cables to the basestations and connect them together with the 50 feet sync cable. Attach the sync cable to the celing. (Developer Edition only)
- Set 1 basestation to A and the other 1 to B using MODE. The MODE button is on the back of the unit, above the power button.
- Long Press to enter Switch Mode
- During the Switch Mode, short presses toggle the modes and long press sets the mode.
- In the front of the basestation, you should see 2 green LED indicating the unit is working. You should also see a A or b indicating the state of the unit.
Head-mounted display setup:
- Connect the HMD to the PC through the interface box. Connect the 3 in 1 cable to the HMD. Connect the short USB and HDMI cables to the PC.
- The interface box has 2 sides. Connect the 3 in 1 cable to the "VR side". Connect the short cables to the "PC side". When the power on and the LED will light up.
- With the 3 in 1 cable, plug the USB, power and the Dark Blue end of the HDMI to the top of the headset. Tread the cables through the loop on the top of the strap.
- Use the outside knob of the HMD to adjust the distance between the lenses based on your IPD. Remove the lens film.
- Eye-relief adjustment. Space for eyewear can be created by extending the face gasket out and re-tightening inside knob. Having lenses closer to your eye results in better field of view.
Controllers setup:
- Each wireless controller requires 2 batteries. Set switch on side to DOWN for battery mode. UP is for USB mode.
- When using wireless mode, use the 2 wireless dongles. Do not plug directly into USB 3.0. Use the included USB hub for better connection.
- When using wired mode, insert board into battery compartment, plug a microUSB cable (not included) into the board then close the battery compartment door. Connect the other end of microUSB cables to your PC. Set the switch on the side for USB mode.
- Use the included lanyards on your wrists for extra protection.
- Inputs on the controllers include a trackpad, trigger, grip buttons, system button and menu button.
Installation:
- Install Steam. Install SteamVR under Tools. Install VR Monitor from SteamVR.
- VR Monitor checks your system's specs. Red, Yellow and Grey lights are bad. Hover over them for more details.
- Run Room Setup Application from VR Monitor.
Apps[edit]
Apps can be purchased from Steam or HTC Viveport.
Developer[edit]
SteamVR[edit]
SteamVR - Valve's VR platform for VR games and other experiences.
OpenVR - OpenVR has all of SteamVR's capabilities minus Steam.
Tracking volume[edit]
- See also: Tracking volume
120°H x 120°V (>21 feet range)
Room size: 15 feet by 15 feet
History[edit]
HTC Vive, partnership between HTC and Valve, was announced on March 1, 2014 in Mobile World Congress in Barcelona.
HTC Vive was showcased for the first time in GDC 2015 from March 2 - March 6.
June 5, 2015: HTC Vive Developer Editions (HTC Vive DK1) began shipping to developers selected by Valve.
January 5, 2016: HTC Vive Pre (HTC Vive DK2) was announced. 7000 of the HMD will ship to select developers in Q1 2016.
February 6, 2016: HTC Vive Pre began to ship to developers.
